There’s something undeniably satisfying about a snack that’s both crisp and tangy, a delightful crunch followed by a burst of flavor that wakes up your taste buds. Enter pickled green beans-a vibrant twist on a classic vegetable that transforms simple beans into a zesty, dill-infused treat. Whether you’re a seasoned pickle enthusiast or a curious kitchen explorer, crafting these crunchy delights at home is easier than you might think. In this article, we’ll dive into the art of pickling green beans with fresh dill, uncovering tips and techniques to help you create your own jar of tangy goodness. Get ready to elevate your snacking game with a homemade pickle that’s fresh, flavorful, and irresistibly crisp.
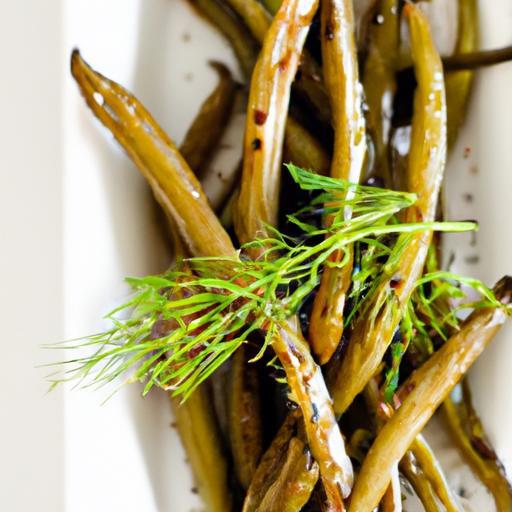
Crunchy Delight: How to Make Pickled Green Beans with Dill
Choosing the right green beans is the first step to create that irresistible crunchy delight in your homemade pickles. when selecting your beans, look for ones that are vibrant green, slender, and snap easily when bent-a sign of ultimate freshness. Avoid pods that appear limp or have blemishes; fresh beans will lock in the crisp texture you crave once pickled. For the best results, opt for snap beans that are harvested young, as mature beans tend to develop fibrous stringiness that can detract from your crunchy experience.
Mastering the dill Infusion for Bold and Radiant Flavors
To elevate this crunchy delight beyond simple pickles, the dill infusion is your bold flavor secret. Fresh dill sprigs impart a vibrant, aromatic punch that complements the bright earthiness of the green beans. Ensure the dill is fresh and fragrant; dried dill pales in comparison and won’t deliver that signature zip.For a more intense flavor, lightly bruising the dill before adding it to your jars releases essential oils, marrying beautifully with garlic, peppercorns, and a touch of mustard seed. This layering of flavors results in a dill infusion that’s unapologetically bright and utterly addictive.
Step by Step Guide to Preserving Crispness in Your Pickles
- prepare your beans: Wash and trim the ends without snapping the beans to avoid moisture loss.
- Blanch briefly: Drop green beans into boiling water for just 30 seconds, then plunge into ice water to halt cooking.
- Sterilize your jars: Hot, clean jars prevent bacteria while keeping the pickles fresh longer.
- Pack beans tightly: Stand beans upright in the jar,ensuring even coverage with the brine for uniform crunch.
- Use cold brine: Start with a cold vinegar and salt solution to firm beans instantly.
- Seal and refrigerate: Allow pickles to rest refrigerated for at least 48 hours to develop crispness and flavor without sogginess.
Tips and Tricks for Storing and Serving your Pickled Green Beans
Storing your crunchy delight correctly ensures every bite stays fresh and lively. Always refrigerate pickled green beans in airtight jars; this prevents softening and maintains that satisfying snap.Consume within 3 to 4 weeks for peak texture and flavor. When serving, they’re impressive straight from the jar alongside cocktails or charcuterie boards. Add a sprinkle of flaky sea salt or a grind of fresh black pepper to amplify thier zest. For a playful crunch, chop pickled beans into salads or serve whole as garnish on Bloody Marys-an elevating touch sure to impress guests.
Prep and cook Time
- Prep Time: 20 minutes
- Brining Time: 48 hours (refrigerated)
- Total Time: Approximately 2 days
Yield
- About 4 pint jars (serves 8-10 as a snack or side)
Difficulty Level
- Easy
Ingredients
- 1 ½ pounds fresh green beans, trimmed and washed
- 4 cups white vinegar (5% acidity for optimal preservation)
- 4 cups water
- 3 tablespoons kosher salt (non-iodized)
- 6 cloves garlic, peeled and lightly crushed
- 6 fresh dill sprigs, bruised gently
- 1 tablespoon black peppercorns
- 1 tablespoon mustard seeds
- Optional: 1 teaspoon red pepper flakes for heat
Instructions
- Blanch the green beans: bring a large pot of water to boil. add beans and blanch for 30 seconds. Promptly transfer to an ice bath to stop cooking and preserve crunch.
- prepare the brine: in a large saucepan, combine vinegar, water, and kosher salt. Heat gently just until salt dissolves. Remove from heat and let cool to room temperature.
- Sterilize jars and lids: Place jars and lids in boiling water for 10 minutes, then set on a clean towel to dry.
- Pack jars: Standing the green beans upright, pack them tightly into the jars. Distribute garlic cloves, dill sprigs, peppercorns, mustard seeds, and red pepper flakes evenly between jars.
- Pour brine over beans: Slowly fill jars with cooled brine, leaving about ½ inch headspace. Tap jars gently to remove air bubbles.
- Seal jars: Wipe rims with a clean cloth. Place lids and screw bands on tightly.
- Chill and wait: Refrigerate jars for at least 48 hours before tasting to allow full flavor development and maximum crispness.
Chef’s Notes
- Using fresh, firm green beans is key-avoid older beans with tough fibers.
- For a zesty twist, add a splash of lime juice or a few slices of fresh ginger into each jar.
- To keep beans crisper longer, reduce blanching time or omit blanching completely for very fresh beans, but this may affect shelf life slightly.
- Make-ahead tip: Prepare jars in advance and let flavors meld up to a week in the refrigerator.
- If you prefer your pickles less tart, adjust vinegar-to-water ratio to 1:1.
Serving Suggestions
Pickled green beans shine as a crunchy snack paired with your favorite cheese platter or alongside smoked meats for a tangy contrast. They are also a classic garnish for Bloody Mary cocktails or added whole to salads for texture and acidity. Try chopping them finely to mix into creamy tuna or egg salad for bursts of bright dill flavor and snap. Garnish with fresh dill sprigs or a sprinkle of cracked black pepper to create an inviting presentation that mirrors their bold flavor.

| Nutrient | Per Serving (approx.) |
|---|---|
| Calories | 15 kcal |
| Protein | 1 g |
| Carbohydrates | 3 g |
| Fat | 0 g |
For more crisp pickle creations, check out our guide on pickled cucumbers. Learn about the science behind perfect pickling at Pickling Guide Institute.
Q&A
Q&A: Crunchy Delight – How to Make Pickled Green Beans with Dill
Q1: What makes pickled green beans with dill such a “crunchy delight”?
A1: The secret lies in the perfect balance between the crispness of fresh green beans and the tangy, herbaceous punch from dill-infused brine. When pickled just right, the beans retain their satisfying snap, making every bite a flavorful, crunchy adventure.Q2: Why dill? What does it add to the pickled green beans?
A2: Dill brings a wonderfully aromatic, slightly grassy note that complements the subtle sweetness of green beans. Its fresh, slightly anise-like flavor transforms a simple jar of pickled beans into a vibrant condiment that tickles the taste buds.
Q3: How do I ensure my pickled green beans stay crunchy?
A3: Freshness is everything! Start with crisp, young green beans. Blanch them briefly to brighten the color and slightly soften the surface, then shock them in ice water to lock in that crunch. Also, using a vinegar brine with the right acidity and a pinch of salt helps preserve their snap.
Q4: Can I customize the brine beyond dill?
A4: absolutely! While dill is the star herb,feel free to add garlic cloves,red pepper flakes,mustard seeds,or even a twist of lemon zest. these additions can add layers of flavor, making your pickled green beans uniquely yours.
Q5: How long shoudl I wait before enjoying these pickled green beans?
A5: Patience pays off! Let the beans marinate in the refrigerator for at least 48 hours to absorb the tangy goodness fully. But for maximum crunch and flavor, a week is ideal - then dive in and savor that crunchy delight.
Q6: What dishes pair well with pickled green beans?
A6: These tangy treats are fantastic as a snack straight from the jar, a zesty garnish for Bloody Marys, or a crunchy side for grilled meats, sandwiches, and charcuterie boards. Their bright acidity also cuts through rich dishes beautifully.
Q7: Is pickling green beans arduous for beginners?
A7: Not at all! With simple ingredients and easy steps, pickling green beans with dill is a fun, accessible project even for novice cooks. Plus, the rewarding crunch and flavor make it worth the little effort.
Q8: Can I preserve my pickled green beans long-term?
A8: Yes! Use proper sterilized jars and follow safe canning guidelines to store your pickled green beans for several months. Otherwise, keep them refrigerated and enjoy within a few weeks for the freshest crunch.
Ready to dive into your own jar of crunchy delight? With these tips and a splash of creativity, pickled green beans with dill will become your new favorite tangy snack!
To Wrap It Up
With jars of crunchy, dill-infused green beans now gracing your kitchen shelves, you’ve unlocked a timeless snack that’s as vibrant in flavor as it is indeed satisfying in crunch. Whether tucked into salads, paired with cheeses, or enjoyed straight from the jar, these pickled green beans bring a burst of tangy freshness to any occasion.Embrace the art of pickling as more than just preservation-it’s a celebration of flavor and texture, crafted by your own hands. So next time you crave a savory snack or a zesty accompaniment, remember: a crunchy delight is just a dill pickle away. Happy pickling!