Golden Bliss: How to Make Buttery Parmesan Corn on the Cob
Golden Bliss begins with selecting the freshest corn, and elevating it by combining creamy butter and sharp parmesan cheese to create a flavor-packed experiance. This beloved summer treat brings nostalgia with every bite but turns into an irresistible gourmet delight when crafted with care. whether you’re hosting a backyard barbecue or craving a comforting side, mastering this recipe will have you savoring tender, sweet kernels bathed in a luscious, cheesy sheen.
Prep and Cook Time
- Prep Time: 10 minutes
- Cook Time: 15 minutes
- Total Time: 25 minutes
Yield
Serves 4
Difficulty Level
Easy
Ingredients
- 4 ears fresh sweet corn, husked and cleaned
- 4 tablespoons unsalted butter, softened
- 1/2 cup freshly grated parmesan cheese
- 1 teaspoon garlic powder
- 1/2 teaspoon smoked paprika (optional for a subtle smoky depth)
- Salt and freshly ground black pepper to taste
- Fresh parsley, finely chopped, for garnish
- Juice of half a lemon (optional, to brighten flavors)
Instructions
- Choose the perfect corn: Look for plump, bright yellow kernels tightly packed on fresh, green husks with moist silk. Sweetness peaks in early summer - buying local or organic ensures maximum tenderness and natural sugars.
- Preheat yoru grill or prepare a large pot of boiling water. For grilling, preheat to medium-high heat for a smoky finish; boiling creates perfectly steamed kernels.
- Cook the corn: If boiling, submerge ears in simmering water for 5-7 minutes until tender but still crisp. For grilling, place corn directly on the rack, turning every 2 minutes until charred golden in spots and tender, about 10 minutes.
- Make the buttery parmesan blend: In a small bowl, mix softened butter with parmesan cheese, garlic powder, and smoked paprika. Add a pinch of salt and pepper; adjust to taste. This mixture melts into the corn, enriching each kernel with a creamy, savory layer.
- Brush the blend generously over the hot corn, letting the residual heat melt it luxuriously. For extra indulgence,add a squeeze of lemon juice to balance richness.
- Garnish with chopped fresh parsley for a pop of color and freshness before serving.
chef’s Notes: Tips for Success
- Sweet corn selection tip: Avoid ears with dry silk or kernels that look shriveled. Snap a kernel; if a milky liquid squirts out, it’s fresh and perfect for this recipe.
- Butter variations: Swap unsalted butter for herbed or roasted garlic butter for an exciting flavor twist.
- Parmesan alternatives: Try Pecorino Romano for a sharper bite or asiago for nuttiness.
- Make-ahead trick: Prepare the parmesan butter blend a day ahead and store in an airtight container in the fridge – soften before using.
- Grilling tip: Wrap corn in foil with the butter mixture for a steamed effect infused with cheese goodness, cooking about 12 minutes.
- Common issue: If your corn kernels are tough, they might potentially be too mature; opt for younger ears next time or blanch longer but avoid overcooking to maintain tenderness.
Serving Suggestions That Elevate Your Parmesan Corn on the Cob Experience
Presentation is everything when you’re sharing Golden Bliss! Serve your parmesan corn on a rustic wooden board garnished with vibrant parsley and a side bowl of extra parmesan for sprinkling. Compliment the dish with a chilled glass of crisp white wine, such as Sauvignon Blanc or a light lager beer, which cuts through the savory richness beautifully.
For a fresh accompaniment, pair this with a citrusy tomato salad or grilled lemon-garlic shrimp to turn this side into an unforgettable feast. Add a sprinkle of chili flakes or a drizzle of truffle oil for an elegant, grown-up touch. And don’t forget to provide small plates and napkins – the buttery parmesan blend makes for delightfully messy fingers, a small price for pure flavor bliss.

| Nutrient | Per Serving |
|---|---|
| Calories | 180 kcal |
| Protein | 7 g |
| Carbohydrates | 25 g |
| Fat | 7 g |
For more tips on ingredient selection and flavor profiles, check out our Ultimate Parmesan Recipes Guide. To understand why fresh corn is the key to sweetness,visit USDA’s official corn quality facts.
Q&A
Q&A: Golden Bliss – How to Make Buttery Parmesan Corn on the Cob
Q1: What makes this buttery Parmesan corn on the cob so irresistible?
A1: It’s the magical marriage of sweet, juicy corn with a rich, velvety buttery glaze infused with savory Parmesan. The golden, nutty cheese adds layers of flavor and a touch of indulgence, transforming simple corn into a gourmet experience. Every bite bursts with buttery goodness and a subtle umami kick that leaves you craving more.
Q2: Can I use frozen or canned corn instead of fresh ears?
A2: While fresh corn on the cob is the star here-offering that perfect balance of crunch and sweetness-frozen corn kernels can be a decent substitute if you’re short on time. Just toss them with the buttery Parmesan mixture in a skillet until heated through. Canned corn tends to be softer and less vibrant, but it can work in a pinch if drained well.
Q3: How do I achieve that perfectly buttery coating without sogginess?
A3: The trick is to start with warm, freshly cooked corn and toss it instantly with melted butter and Parmesan while it’s hot. the heat helps the butter and cheese cling to every kernel, creating a luscious but not greasy finish. Slightly drying the corn with a paper towel before tossing can also prevent moisture buildup.
Q4: Is there a way to add a little extra zing or crunch to this dish?
A4: Absolutely! Sprinkle some freshly cracked black pepper or a pinch of smoked paprika for a subtle smoky heat. For crunch,a dash of toasted breadcrumbs or crushed toasted nuts like pistachios can add a delightful contrast that elevates the mouthfeel and presentation.
Q5: What type of Parmesan cheese should I use?
A5: Opt for freshly grated Parmigiano-Reggiano if you can-it has a richer, nuttier profile compared to pre-grated varieties. Its granular texture also helps the cheese melt evenly and coat the corn beautifully. Avoid powdered Parmesan, as it won’t provide the same depth of flavor or texture.
Q6: Can this recipe be adapted for a vegan diet?
A6: Definitely! Swap the butter for a plant-based vegan butter or olive oil and choose a dairy-free Parmesan choice made from nuts or nutritional yeast. While the flavor won’t be exactly the same, these substitutions still deliver a creamy, cheesy essence that’s deliciously satisfying.
Q7: What’s the best cooking method to prepare the corn before adding the Parmesan butter?
A7: Boiling or steaming the corn ensures juicy tenderness. For a slight smoky edge, grilling the corn first is perfect-it imparts caramelized char marks that intensify sweetness and complement the Parmesan butter magnificently. Just remember to brush the corn with some butter before and after grilling for extra richness.
Q8: Can I make this recipe ahead of time for a party?
A8: It’s best enjoyed fresh for that glorious melt-in-your-mouth effect. However, you can pre-cook the corn and prepare the Parmesan butter ahead, than reheat the corn gently and toss it with the butter mixture right before serving. This keeps the flavors vibrant and the corn luscious without drying out.
Transform your next summer meal with this golden bliss of buttery Parmesan corn on the cob – a simple classic elevated with gourmet flair!
In Conclusion
As the golden kernels glisten with buttery Parmesan goodness, you’ve unlocked the secret to elevating a simple ear of corn into a true culinary delight. Whether you’re hosting a summer barbecue or craving a cozy side dish, this Golden Bliss recipe promises to bring rich, savory joy to every bite. so next time you crave that perfect harmony of creamy butter and sharp Parmesan, remember – a little love, a dash of salt, and this method are all you need to transform humble corn on the cob into a feast-worthy masterpiece. Happy cooking, and may your table always be filled with golden bliss!

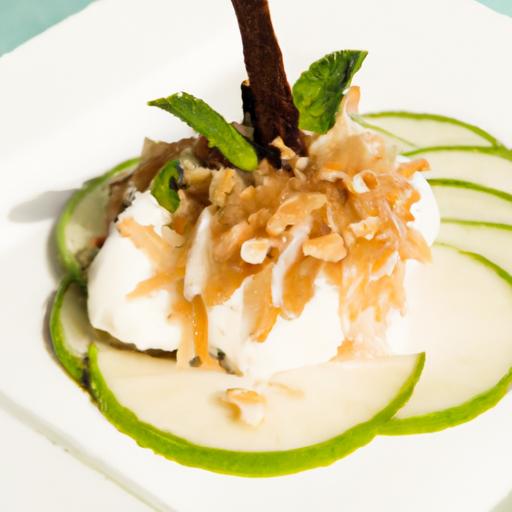
Tropical Bliss begins with the absolute joy of selecting fresh, vibrant ingredients that bring this Coconut Lime Parfait to life. each element plays a crucial role in balancing the bright, tangy notes of lime with the creamy, mellow sweetness of coconut, crafting a dessert that feels like an escape to a sun-kissed island with every spoonful.
Prep and Cook Time
- Readiness: 20 minutes
- Chilling Time: 2 hours
- Total Time: 2 hours 20 minutes
Yield
- Serves 6 individual parfaits
Difficulty Level
- Easy
Ingredients
- 1 ½ cups full-fat coconut milk, chilled
- ¾ cup greek yogurt (preferably plain, whole milk)
- ½ cup shredded sweetened coconut, toasted
- ⅓ cup honey or agave syrup
- 1 tablespoon freshly grated lime zest (from about 2 limes)
- ¼ cup fresh lime juice (about 2 limes)
- 1 teaspoon pure vanilla extract
- ½ cup chopped fresh pineapple or mango, diced small
- 1 cup granola or toasted coconut flakes for crunch
- Fresh mint leaves for garnish
- Optional: thin lime slices or edible flowers for decoration
Step-by-Step Instructions
- Prepare the coconut cream base: Carefully refrigerate a can of full-fat coconut milk overnight. Once chilled, scoop out the thickened cream layer into a bowl (discard or save the water for smoothies). Use an electric mixer to whip the coconut cream untill light and fluffy.
- Incorporate yogurt and flavorings: Gently fold in the Greek yogurt, honey, lime zest, lime juice, and vanilla extract into the whipped coconut cream, blending until smooth but still airy. This mixture forms the luscious parfait base.
- Toast the coconut: In a dry skillet, toast the shredded coconut over medium heat until golden and fragrant, about 3-4 minutes, stirring frequently to avoid burning. Allow it to cool.
- Layer the parfaits: Begin assembling by spooning a layer of the coconut-lime cream into clear glasses or jars. Add a sprinkle of toasted coconut, a few pieces of diced pineapple or mango, then a layer of granola for crunch. Repeat to fill the container, finishing with a dollop of cream and a final garnish of toasted coconut and mint.
- Chill before serving: Refrigerate the parfaits for at least 2 hours. This allows the flavors to meld and the texture to set to a refreshingly creamy consistency.
- Serve with style: Add a twist by decorating the top with a thin slice of lime or an edible flower. Serve chilled for maximum tropical bliss.
Tips for Success: Balancing flavors and Textures
- Choose ripe fruit: Using fresh pineapple or mango enhances natural sweetness and adds a juicy contrast to creamy layers.
- Adjust sweetness: Depending on your palate, tweak the honey or agave amount. Lime’s acidity can overpower if not balanced well with sweetness.
- Whip coconut cream thoroughly: Whipping until fluffy is essential to avoid a dense or greasy texture-cold coconut milk is key to this step.
- Crunch contrast: Granola or toasted coconut flakes add a necessary crunch; skipping it may leave the dessert flat.
- Make ahead: The parfait can be prepared a day in advance. Just add crunchy elements right before serving to maintain texture.
Creative Presentation Ideas to Elevate Your Coconut Lime Dessert
Serve these parfaits in clear glass jars or martini glasses to highlight their vibrant layers. Using tall glasses emphasizes the height and lush textural contrasts. Adding a colorful straw or bamboo spoon elevates the tropical experience. for an exotic twist, sprinkle a dash of toasted cardamom or finely chopped pistachios atop.
Consider pairing this dessert with a refreshing iced green tea or a lightly spiced rum cocktail to further complement the zing of lime and coconut cream. For an inviting touch,place the parfaits on a banana leaf or a woven tray to deliver an authentic island vibe.
Nutritional Details
| Nutrient | Amount per Serving |
|---|---|
| Calories | 280 kcal |
| Protein | 6 g |
| Carbohydrates | 30 g |
| Fat | 12 g |
For further inspiration on tropical desserts, check out our Tropical Fruit Desserts Collection. For detailed nutritional guidance on coconut products, visit the NutritionValue.org page.

Q&A
Q&A: Tropical Bliss – How to Make a refreshing Coconut Lime Parfait
Q: What inspired the creation of the Coconut Lime Parfait?
A: Imagine a sun-soaked beach, the gentle rustle of palm leaves, and the zesty zing of lime mingling with creamy coconut – that’s the heart of this parfait. It’s a celebration of tropical flavors designed to whisk you away to paradise with every spoonful.
Q: What are the key ingredients that make this parfait so refreshing?
A: The magic starts with rich coconut yogurt or cream, which provides a velvety base. Fresh lime juice and zest add a bright, tangy punch, while a sprinkle of toasted coconut flakes lends crunch and depth. sweetness comes naturally from honey or maple syrup, balancing the tartness perfectly.
Q: How do the layers in the parfait contribute to the overall experience?
A: Layering is where the beauty happens – alternating creamy coconut, zesty lime-infused components, and crunchy elements. Each spoonful offers a spectrum of textures and flavors, from silky smoothness to vibrant citrus bursts and nutty crunch, making every bite a mini tropical adventure.
Q: Can this parfait be adapted for dietary preferences or restrictions?
A: Absolutely! The recipe is naturally gluten-free and vegan-pleasant when using plant-based yogurt and sweeteners like agave or maple syrup. You can also swap in your favorite granola or fresh tropical fruits like mango or pineapple to make it your own.
Q: What’s the best way to serve the Coconut Lime Parfait for maximum enjoyment?
A: Serve chilled in clear glasses to showcase its gorgeous layers, garnished with a lime twist and a sprinkle of toasted coconut. It’s perfect as a light breakfast, an uplifting dessert, or a refreshing snack to beat the heat.
Q: Any tips for enhancing the flavor profile?
A: For an extra tropical kick, try infusing the coconut cream with a touch of vanilla or a splash of rum extract.Fresh mint leaves add a cooling note,while a handful of chopped macadamia nuts gives a buttery crunch.
Q: How far ahead can you prepare this parfait?
A: You can assemble it a few hours in advance and keep it in the fridge to let the flavors meld beautifully. Just add crunchy toppings like granola or toasted nuts right before serving to keep that satisfying texture intact.
Q: What makes the Coconut Lime Parfait a perfect treat for warm weather?
A: Its light, creamy texture combined with the zesty freshness of lime creates a naturally cooling dessert. it’s hydrating,not overly sweet,and packed with the tropical vibes that refresh the spirit,making it an ideal indulgence under the summer sun.
to sum up
As the layers of creamy coconut and zesty lime come together in this tropical parfait, you’re not just creating a dessert-you’re crafting a mini escape to sun-dappled shores and balmy breezes. Whether served as a light finish to a summer meal or a luscious treat on a warm afternoon, this coconut lime parfait brings a refreshing twist that’s both simple and satisfying. So next time you crave a burst of island flavor, remember: paradise is just a spoonful away. Dive in, savor the chill, and let this tropical bliss brighten your day.
Choosing the Ideal Cut for Juicy Teriyaki Chicken
Savor Flavor starts with selecting the perfect chicken cut that promises juiciness and tenderness. For the ultimate teriyaki chicken experience, bone-in, skin-on chicken thighs reign supreme. These cuts offer richer flavor and moisture retention compared to breasts,which can dry out quickly under high heat.If you prefer leaner options, opt for boneless, skinless thighs to maintain tenderness without sacrificing ease of eating. When choosing your chicken,look for pieces with a nice pink hue and minimal excess fat; fresh,high-quality poultry makes all the difference in texture and taste.
Crafting the Ultimate Teriyaki Sauce from scratch
Creating your own teriyaki sauce is where the magic truly begins. A harmonious balance of savory, sweet, and umami notes will elevate your dish beyond store-bought sauces.Start with soy sauce for the salty backbone, add mirin and sake to incorporate subtle sweetness and depth, and finish with freshly grated ginger and garlic for aromatic warmth. Sweeten naturally with honey or brown sugar, simmering the mixture gently until it thickens to a luscious glaze. For that irresistible shine, a cornstarch slurry stirred in at the end will lend your sauce a silky texture perfect for coating every bite.
Mastering the Art of Marination for Maximum Flavor
marinating your chicken is essential to soak every fiber with that rich teriyaki essence. combine the freshly made sauce with a splash of sesame oil and a hint of crushed red pepper for a gentle heat. Allow the chicken to marinate for at least 1 hour, but ideally overnight in the refrigerator to deepen the flavors and tenderize the meat. Turn the pieces occasionally to ensure even absorption. This patient step transforms simple chicken into a savory treasure that sings with each bite.
Building the Perfect Bowl with Fresh and Complementary Sides
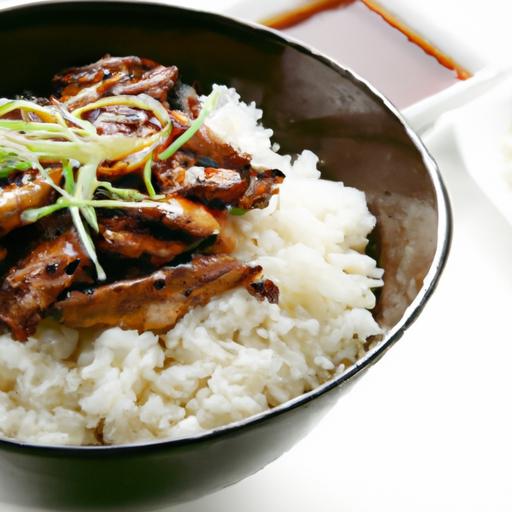
Your teriyaki chicken deserves a bed of freshness that highlights its bold flavors.Start with steamed jasmine rice or sticky sushi rice that provides a neutral, fragrant base. Add crisp stir-fried vegetables like snap peas, julienned carrots, and bell peppers for crunch and color. A sprinkle of toasted sesame seeds and freshly sliced scallions on top introduces texture and brightness. For extra indulgence, add pickled ginger or a soft boiled egg. These thoughtful accompaniments round out the bowl, crafting an inviting meal that balances sweet, savory, and fresh perfectly.
Prep and Cook Time
- Preparation: 15 minutes
- Marination: 1 to 12 hours
- Cooking: 20 minutes
- Total time: Approximately 1 hour 35 minutes (including marination)
yield
Serves 4 generous bowls
Difficulty Level
Medium – approachable for home cooks ready to master flavorful layering
Ingredients
- 1.5 lbs bone-in, skin-on chicken thighs, trimmed
- ¼ cup soy sauce (preferably low sodium)
- 3 tbsp mirin
- 2 tbsp sake
- 2 tbsp honey or brown sugar
- 1 tbsp grated fresh ginger
- 2 garlic cloves, minced
- 1 tsp toasted sesame oil
- 1 tsp cornstarch mixed with 1 tbsp cold water (slurry)
- 2 cups cooked jasmine rice
- 1 cup snap peas, trimmed
- 1 medium carrot, julienned
- 1 red bell pepper, thinly sliced
- 2 scallions, thinly sliced
- 1 tsp toasted sesame seeds
- Pickled ginger and soft boiled eggs (optional, for garnish)
Instructions
- Prepare the Teriyaki Sauce: In a small saucepan, combine soy sauce, mirin, sake, honey, grated ginger, and minced garlic. Bring to a gentle simmer over medium heat.
- Thicken the Sauce: Stir the cornstarch slurry into the sauce and cook until glossy and thickened, about 2-3 minutes. Remove from heat and set aside to cool.
- Marinate the Chicken: Place chicken thighs in a ziplock bag or shallow dish. Pour half of the cooled teriyaki sauce over the chicken, reserving the rest.Seal and marinate in the fridge for at least 1 hour or overnight.
- Cook the Chicken: Heat a skillet over medium-high heat. Remove chicken from marinade, let excess drip off. Sear skin-side down for 6-8 minutes until skin is crisp and golden, then flip and cook another 6 minutes or until cooked through.
- Glaze the Chicken: Brush reserved teriyaki sauce over the chicken during the last 2 minutes of cooking to create a sticky, flavorful coating.
- Prepare the Vegetables: In a separate pan, stir-fry snap peas, carrots, and bell pepper with a drizzle of sesame oil until just tender-crisp, about 3-4 minutes.
- Assemble the Bowls: Spoon warm jasmine rice into bowls, arrange the teriyaki chicken on top, and scatter stir-fried veggies alongside.
- Garnish and Serve: Sprinkle with toasted sesame seeds, sliced scallions, and optional pickled ginger or soft boiled eggs for a vibrant finish.
Tips for Success
- Make it Gluten-Free: Use tamari rather of soy sauce for an equally rich but gluten-free option.
- advanced marination: For deeper flavor, add a splash of orange juice to the marinade for subtle citrus notes.
- Chicken Variations: Bone-in thighs retain moisture best; if using breasts, consider pounding them to even thickness to avoid dryness.
- Make Ahead: Sauce keeps refrigerated up to 5 days.Reheat gently before glazing chicken.
- Searing Tips: Don’t crowd the pan to ensure a crisp skin and beautiful caramelization.
Serving Suggestions
Serve your teriyaki chicken bowl with a chilled green tea or a tangy cucumber salad for refreshing contrast. Garnishes like nori strips, pickled daikon, or a drizzle of spicy mayo can add layers of texture and flavor, making each bite a true delight. Present the bowls in colorful ceramic dishes to emphasize the vibrant hues of the fresh vegetables and glossy chicken glaze, inviting your guests to savor flavor in every mouthful.
| nutrient | Per Serving |
|---|---|
| Calories | 450 kcal |
| Protein | 35 g |
| Carbohydrates | 45 g |
| Fat | 12 g |

For more flavorful Japanese-inspired meals, explore our Japanese Dinner Recipes. To deepen your understanding of marination science, visit Serious Eats’ Food Lab.
Q&A
Q&A: Savor Flavor – How to Make Perfect Teriyaki Chicken Bowls
Q1: What makes teriyaki chicken bowls so irresistible?
A1: It’s all about the harmony between sweet, savory, and umami tastes. The tender, juicy chicken coated in that glossy, sticky teriyaki glaze pairs perfectly with fluffy rice and fresh veggies, creating a bowl that’s both comforting and vibrant. each bite delivers layers of flavor that dance on your palate!
Q2: What’s the secret to the perfect teriyaki sauce?
A2: The magic lies in balancing soy sauce, mirin, sake (or a splash of rice vinegar), and a touch of sweetness from sugar or honey. Gently simmering these ingredients until the sauce thickens gives it that luscious, syrupy texture that clings beautifully to your chicken. Adding fresh garlic and ginger amps up the flavor complexity.
Q3: Can I use chicken thighs or breasts? Which is better?
A3: Both work wonderfully, but chicken thighs are the star for juiciness and tenderness. They absorb the teriyaki glaze more deeply and remain juicy even when cooked a bit longer. Chicken breasts are leaner and great if you prefer a lighter option-just be careful not to overcook them!
Q4: How do I get that perfect caramelized char on the chicken?
A4: After marinating the chicken in teriyaki sauce, cook it over medium-high heat to develop a slight char-this adds smoky depth and gorgeous color. Using a cast-iron skillet or grill pan helps get those perfect grill marks. Just don’t crowd the pan; give each piece space to sizzle.
Q5: what sides and toppings bring the bowl to life?
A5: Fluffy steamed jasmine or sushi rice is the classic base.Add steamed or stir-fried veggies like broccoli, snap peas, or bell peppers for crunch and color. Top with sliced green onions, toasted sesame seeds, and a sprinkle of pickled ginger or crunchy fried shallots for that wow factor.
Q6: How can I make this dish healthier without sacrificing flavor?
A6: Swap white rice for brown rice or cauliflower rice for extra fiber. Use low-sodium soy sauce and cut back slightly on sugar in the sauce. Load up on crisp veggies and consider air-frying or grilling the chicken instead of pan-frying in lots of oil. The key is maintaining the bold teriyaki flavor while dialing back the less nutritious elements.
Q7: Can I prepare teriyaki chicken bowls ahead of time?
A7: Absolutely! Marinate the chicken overnight for maximum flavor infusion, then cook just before serving. You can prep rice and vegetables in advance too-reheat gently to keep everything fresh. This makes for a fantastic meal prep option packed with flavor that tastes fresh every time.
Enjoy crafting your own perfectly balanced teriyaki chicken bowl – a dish that’s as delightful to make as it is to eat!
Insights and Conclusions
As you savor each bite of your perfectly crafted teriyaki chicken bowl, remember that the magic lies not just in the ingredients but in the balance you create-sweet, savory, and a hint of umami dancing together in harmony. Weather you’re a seasoned chef or a kitchen adventurer, these bowls offer a canvas for your creativity and a tasty way to nourish both body and soul.So next time you crave a comforting meal with a burst of flavor, whip up this vibrant dish and enjoy the satisfying symphony of tastes that only a perfect teriyaki chicken bowl can deliver. Happy cooking-and even happier eating!
Choosing the Perfect Ingredients for a Vibrant Coconut Lime Parfait
The secret to crafting a truly memorable coconut lime parfait lies in selecting fresh, high-quality ingredients that burst with tropical vibrancy. Start with rich, creamy coconut milk-ideally, full-fat and unsweetened for that luscious texture and authentic flavor. pair it with zesty, freshly squeezed lime juice and finely grated lime zest to infuse each layer with shining citrus notes that awaken the palate. Choose natural sweeteners like organic cane sugar or honey to balance the sharpness and highlight the parfait’s fresh essence. For added texture and depth, incorporate toasted coconut flakes and crisp granola. These thoughtfully chosen components harmonize beautifully, creating a dessert that’s both refreshing and indulgent.
Mastering the Art of Layering Flavors and Textures
Layering is where your coconut lime parfait transforms from simple ingredients into a visually stunning and flavor-packed masterpiece. Begin with a smooth coconut cream base that coats the palate with silky richness. Next, alternate with a tangy lime curd or a vibrant lime gelatin for bursts of citrus brightness. Introduce layers of crunchy elements like toasted almonds, pistachios, or a nutty granola blend for delightful contrast. Between these, add whipped coconut cream for lightness that melts effortlessly against the tart layers. Balance is key-aim for a sequence that alternates creamy, crunchy, and zesty components, creating a symphony of textures in every spoonful. remember,tall clear glasses showcase these layers beautifully,inviting guests to savor each colorful stratum visually before tasting.
Creative Twists to Elevate Your Tropical Dessert Experience
Elevate your rendition by experimenting with unexpected tropical ingredients. try folding in diced mango or passionfruit pulp for sunny bursts of sweetness that complement lime’s tartness. Infuse the coconut milk with fresh vanilla bean or a touch of cardamom to add nuanced warmth and aroma.For an adult twist, a splash of rum or coconut liqueur can boost complexity without overpowering the refreshing base. Consider a crunchy layer of candied ginger or a sprinkle of chili flakes on the top for a subtle kick that tantalizes the taste buds. To accommodate dietary preferences, swap granola for gluten-free nuts or use coconut yogurt as a plant-based option to conventional cream layers. Each variation keeps the essence of the tropical delight alive while adding your signature flair.
Tips for Serving and Storing Your Refreshing Parfait
Presentation is as important as flavor when serving your coconut lime parfait. Use slender glasses or stemmed dessert bowls that highlight the dessert’s colorful layers. Garnish with lime zest curls, sprigs of fresh mint, or delicate edible flowers for an elegant, tropical look. Serve chilled to ensure the parfait remains refreshingly cool, enhancing the citrus notes and coconut cream’s silkiness. If preparing ahead, assemble the individual layers but hold off on crunchy toppings to prevent sogginess-add these just before serving. Store the parfait covered in the refrigerator for up to 2 days; the flavors deepen with time, but texture is best when freshly assembled. For travel or events, assemble in mason jars for easy transport and an instagram-worthy tropical treat.
Q&A
Q&A: Tropical Delight – How to Make a Refreshing Coconut lime Parfait
Q1: What makes a Coconut Lime Parfait the perfect tropical treat?
A1: The magic lies in its vibrant fusion of creamy coconut and zesty lime, creating a balance that’s both refreshing and indulgent. It’s like a little tropical vacation in a glass-cool,light,and bursting with island-inspired flavors that instantly transport your taste buds to a sun-kissed beach.
Q2: What are the key ingredients I need to create this parfait?
A2: The stars of the show are coconut milk or coconut cream for that rich, velvety texture; fresh lime juice and zest to add zingy brightness; a sweetener like honey or agave to balance the tartness; and a crunchy component such as toasted coconut flakes or granola for delightful contrast.Optionally, fresh tropical fruits like mango or pineapple can elevate it even further!
Q3: can I make this parfait dairy-free and vegan?
A3: Absolutely! Using coconut milk or coconut yogurt instead of dairy-based ingredients keeps the parfait creamy and luscious without any animal products.Sweeten with natural plant-based options like agave syrup or maple syrup, and you’ve got a perfectly vegan tropical delight.
Q4: How do I achieve the perfect texture in the parfait layers?
A4: The secret is layering thoughtfully. Whip the coconut cream or yogurt to a fluffy consistency, then gently fold in lime juice and zest for that refreshing kick.Alternate this creamy mixture with layers of crunchy granola or toasted coconut and juicy fruit chunks. Chill the parfait for at least an hour so the flavors meld and the layers set beautifully.
Q5: What’s a fun twist to add some extra flair to the Coconut Lime Parfait?
A5: Try incorporating a sprinkle of toasted macadamia nuts or a drizzle of passionfruit syrup on top. For an adult version, a splash of rum or coconut liqueur can add a tropical cocktail vibe.Finish with a sprig of fresh mint or edible flowers to wow your guests with presentation and flavor.
Q6: When’s the best time to enjoy a Coconut Lime Parfait?
A6: This parfait shines brightest on a warm afternoon or as a light, refreshing dessert after a spicy meal. It’s also a wonderful pick-me-up any time you crave a burst of sunshine and zest-perfect for summer brunches, casual get-togethers, or whenever you need a little tropical escape.
In Retrospect
As the last spoonful of your Tropical Delight coconut lime parfait melts away, you’re left with more than just a lingering taste of paradise-you carry a little piece of sunshine and zest crafted by your own hands. This refreshing dessert is more than a recipe; it’s an invitation to savor the vibrant harmony of creamy coconut and tangy lime whenever the craving strikes. Weather served at a festive gathering or as a personal treat, this parfait promises to brighten your day with every bite. So next time the tropical breeze calls, remember: a taste of bliss is just a parfait away.
